

How to Setup Ecamm Live for Live Streams & Video Content Creation
Sep 02, 2022The Best Ecamm Live Preferences for Recorded & Live Videos
Getting started with Ecamm Live?
Ecamm Live is my go-to tool not only for live streaming but also for creating over 90% of my video content including social media.
If you haven't tried it yet, I highly encourage you to try it and experience its amazing features.
Click here for a 2-Month free trial! Use the Diana2MOS code as you register.
The Ecamm Live Preferences Menu allows you to choose and customize the right setup for your show no matter if you're live streaming or creating regular video content.
In this post, I want to show you the best Ecamm Live Preferences to use for video content creation.
Let's dive in.
Where Can You Find the Ecamm Live Preference Window
Inside Ecamm Live, you can see different icons on your main screen.
To access the Ecamm Live Preferences window, hover your mouse on the right side of your screen < locate and click the gear icon.

Ecamm Live Preferences
The Ecamm Live Preferences have different tabs with different functionalities.

The tabs inside the Ecamm Preferences are:
- General
- Account
- Stream
- Video
- Audio
- Interview
- Screen Sharing
- Twitch
- YouTube
Let's dig down into each tab.
⚡️ Pro Tip ⚡️
I highly encourage you to follow along with the options that I’ve checked even if they're not fully explained at the beginning of this tutorial.
There are things that will only make sense as we go deeper into the advanced options of Ecamm Live.
You can always go back and change those settings as you learn more about how these options work and fully understand what setup you need for your show.
General Tab
The general tab has all the basic settings that you need for your show.

Play App Sound
Did you ever hear a pop-up sound while you’re live streaming?
People can engage with your show.
They can send like, heart, or comment on your show.
The pop-up sound was caused by the engagements you received from your audience. You and your audience can hear it.
Uncheck the Play App Sound option to remove the pop-up sound.
Show Animated Reaction
Do you love seeing engagements from your audience?
The Show Animated Reaction option will let you see the reactions given by your audience.
You can see the thumbs-ups, hearts, and likes flying on your screen.

I highly encourage you to keep it available because these reactions represent your audience's activity.
It feels so much better to see your audience's participation.
No one can see those reactions except you.
Automatically Hide Comment Overlays after <blank> seconds
If you received an interesting comment or a question from your audience, it is better to share it with everyone.
Let your audience see and read the comment too.
You can display the comment on your screen, read it and give your reaction or the answer if it is a question.

The Automatically Hide Comment Overlay Option allows you to set how long the comment will be displayed on your screen.
I found that 39 seconds would be the most natural time progression to display a comment.
Setting this option will let Ecamm automatically hide the comment from your screen.
Choose Recording Folder
Are you curious about where your recording files were stored?
The Choose Recording Folder option allows you to select the storage location for your recording files.
You can save your files to your computer or on an external hard drive.
Stream Tab
On the Stream Tab, you can see the options that allow you to set up your Stream Size, Stream Shape, and Frame Rate.
You can also set the video and audio mode in high quality and choose the recording format of your show.
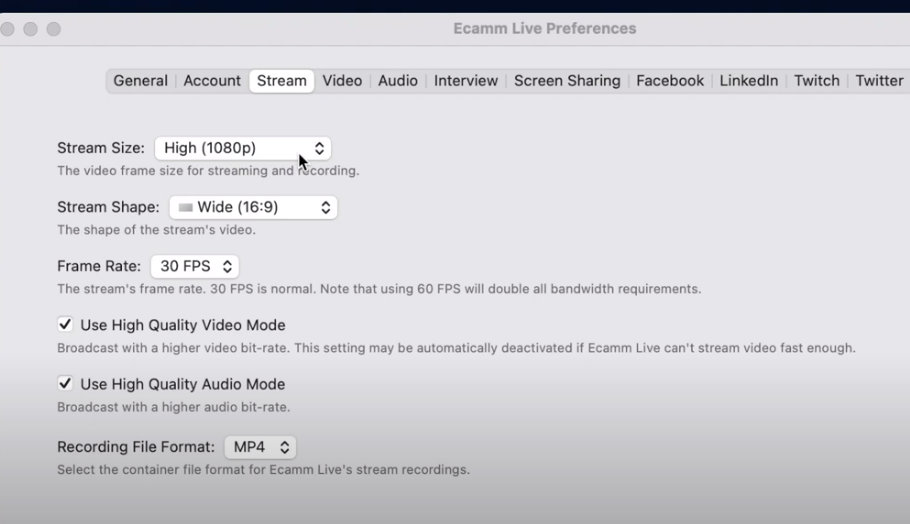
Stream Size
You can set the Stream Size from the lower up to the highest resolution.
You can set it as low as 540p or set it to 4k(2160p) as the highest resolution.
The standard high resolution is 1080p.

Stream Shape
The Stream Shape allows you to customize how your image will be displayed on your screen.
You can set it to wide (16:9), extra wide ( 2:1), classic (4:3), square, and tall (9:16).
My screen is set to wide.

Frame Rate
When setting up your frame rate, I encourage you to choose the frame rate based on your camera.
You can set your frame rate from 24 FPS up to 60 FPS.
Whether you’re using a mirrorless camera or a webcam, I highly recommend the 30 FPS setting.

Video and Audio Mode
For the video and audio quality, I highly encourage you to set it to High Quality.
Always take into consideration the performance of your computer.

Recording File Format
For your Recording File Format, you can choose between MOV or MP4 files.
Video Tab
This tab allows you to customize how your show will operate.

Default Source Mode
In this option, you need to set your source mode. It could be a camera, a blank screen, or a shared screen depending on what you intended to do in your scene.
For my Default Source Mode, I set it to the camera.
Whenever I start a new scene, it will always use the camera as the source.
For me, it is always best to set the camera as the default source. You will usually use your camera as you go through your show.
You can always change the source for each scene that you will create.

Default Transition
Ecamm has built-in different transition options.
You can choose from:
- Cross Dissolve
- Slow Cross Dissolve
- Slower Cross Dissolve
- White Flash
- Swipe
- Cross Zoom
- Light Rays
- Ripple
- Copy Machine
Mine is always set to Cross Dissolve. I found it be to the most normal and natural transition for my shows.
Fade Out When Finished
This option allows you to set your end scene to fade into a black screen as your show ends.


If you set an image and a thank you message on your end scene, it will fade slowly into a black screen.
It will only take a few seconds and this is a nice way to end your show.
Disable Built-in Camera
This is optional.
You can enable this option if you don’t like having your built-in webcam available as you go through your show.
Audio Tab
Audio is the most important thing you need to consider when doing a live stream or any kind of content.
In this tab, you can customize the audio setting of your show.

Speakers
In this option, you need to select your audio source or the microphone that you will use for your show.
Most creators in the Ecamm community use the Rode Caster Pro to maintain all of the audio features when it comes to bringing in a phone call or bringing in audio from the Clubhouse or from another application.
Broadcast System Audio
If you plan to share your screen during your show, I encourage you to select the When Sharing The Screen option.
This option will be very helpful if you plan to play a video or share training videos from a website.
It allows you to get audio from your computer.
Automatically Mute Microphone and Guest Audio During Video Play Back
This option will depend on how you envision your show.
If you plan to play a video most of the time during your show and there will be no conversation between you and your guest while the video is playing, you can enable this option.
Mic Delay
Did you notice that your audio and video were out of sync?
Do you experience a delay with the words that you say versus the movement of your mouth?
For some reason, some cameras and microphones introduce a delay when transferring data.
If you’re using a camera like a Sony or a Canon mirrorless camera, you may experience delays.
Any delay will depend on your microphone and the program you use on your camera sources.
This issue isn’t within Ecamm but the Mic delay option is a built-in tool to help minimize the delay.
You can set the Mic Delay option to 3 or 4. It will help your video and audio sync together.

⚡️ Pro Tip ⚡️
One way that can help you improve your audio quality is to invest in good-quality USB-C and HDMI cables.
Map Input Channels 1 and 2 to Left and Right Stereo and Mute Movie Sound On Speakers
These options will depend on your show. You can enable these options if needed.
I didn’t enable these options because they are not necessary for my setup.
⚡️ Pro Tip ⚡️
I always encourage you to wear headphones to manage your audio.
This way, you will be able to hear clearly if your audio is too loud or too soft.
You can also manage the audio from your guest.
Interview Tab
This tab will be helpful when bringing in a guest to your show using a link to join.
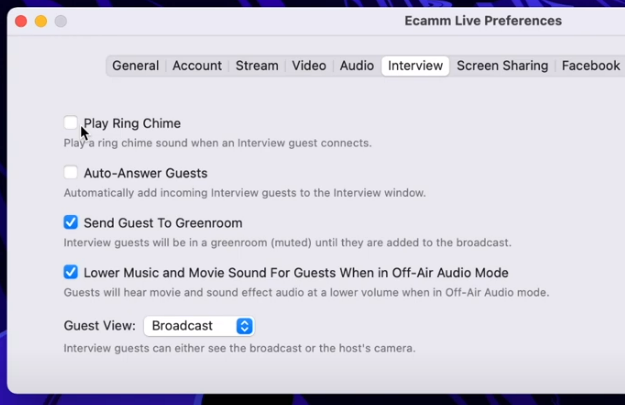
Play Ring Chime
Do you hear a chime ring whenever someone asked to join your show?
When the Play Ring Chime option is turned On, you'll hear a chime ring every time someone with the show link tries to join your show.

You and your audience can hear this sound.
I decided to turn it Off to avoid distraction when a lot of people are requesting to join the show.
Auto-Answer Guest
This option allows you to auto-accept people requesting to join your show.
You don't need to click the accept button and you can go on talking while people are coming in into your show.
If you sent out the show link to certain people, it is okay to turn this option On.
But if the link is available to everyone, you might want to turn this option Off.
I never turn this option On.
I always wanted to accept the join requests so I can manage who was coming in on my show.
Send Guest to Greenroom
This option allows you to put your guest speakers in a place where your audience can't see and hear them.
Only you can communicate with your guest while they are in the Greenroom.
This will give your guests time to prepare and be ready to join the discussion.

Lower the Music and Movie Sound For Guests When in Off-Air Audio Mode
I love this option!
It allows you to lower the volume of your video while you and your guest speaker are talking.
You, your guest, and your audience can hear you while the background music is playing.
This setup will give your guest a good environment and the best experience for your audience in a live show.
Screen Sharing Tab
This tab is very helpful when you're doing a show and you will be sharing your screen.
Creators who are doing tutorial videos love this option.
I love this option! I almost enable all the options in this tab.

For the Optimization, I chose Better Quality.
Use the slider to choose the optimization for your show.
Include Mouse Cursor
Enabling your mouse cursor will let your audience see what you're pointing to on your screen.
I keep my cursor at normal size because for me a gigantic cursor feels a little bit weird if you're doing a live show.
I also enable the Show Mouse Clicks to let my audience see what I am clicking.
When you click anything on your screen, a circle will form in that area.
This is very helpful especially if you're doing a tutorial and your audience is following you along.

Show Everything When Sharing the Entire Screen
You can enable this option if you plan to share your entire screen while live streaming.
Just take note that it will show exactly what's on your screen including your Desktop icons.
Final Thoughts
Ecamm Live provides a lot of customizing options to help you create quality content.
You don't have to feel stuck with the setting that you currently have.
You can always change any of these settings or preferences as you grow as a content creator.
You can achieve the kind of setup that you envision for your show.
Are you planning to use the Sony ZV-E10 for live streaming?
Curious about how to set it for live streaming?
Click (here) to learn the camera settings that you need to set up if you plan to use the Sony ZV-E10 with Ecamm Live.
