

Developing a System When Creating Content vs Blindly Buying Gear
Sep 30, 2021Has this ever happened to you?
You carve out time to record a video or live stream and you sit down, get your lights situated, drink some water...you know, all the pre-record ritual stuff.
Only to see when you turn on your camera...the image looks weird or your microphone isn't working.
Call after call, consultation after consultation, and you know what the problem usually is when I hear this from clients?
Not having a competent system when live streaming.
Building a Live Streaming and Recording System
This isn't to say your gear is "bad" or "cheap" but most of the time it's buying a lot of equipment hoping or assuming they'll work well together as a system.
This couldn't be further from the truth.
To have a great live streaming or recording setup, you need to invest in gear that builds out a SYSTEM for streaming or recording.
If you're confused on how to do that, let's break this down.
Audio
XLR or USB Microphone?
Depending on what you choose will determine what you need next.
If you're using a streaming setup or a recording setup at your desk, your microphone will connect to your computer in some capacity. Whether directly via USB or via an audio interface like the Rodecaster Pro or Behringer 202HD.
If you're using a USB Hub, make sure it's a great one like the CalDigit TS3 that has fast ports for transferring data.
Once that's set, what's your number?
You need to know, from heart, what your perfect audio level is for YOUR VOICE.
When I used my Samson Q2U via USB it was 67%. Now, with my Shure SM7B it's 70%. When you know your number when you're getting ready to live stream or record, you can instantly tell if your audio is too loud or too soft.
So, know your number.
Video
No matter what camera you're using, you're usually connecting via HDMI or via USB to your computer or a USB Hub.
Either way, the biggest thing to watch for is poor cable performance.
Many choppy footage images or delays often are a result of cables that are slow when transferring data from the camera to the computer.
When investing in what you intend to use, this is where many systems break down.
I really enjoy the cables from JSAUX and if it's been a year since you updated your cables, get some new ones.
When it comes to live streaming and recording videos when transferring data from your camera to your computer, cables usually are the culprit for glitchy-looking images making you question your entire setup.
Lighting
This is a huge deal because it's enough to make some frustrated enough to be ready to quit.
The simpler your lighting setup is, the easier it is for you to create.
If you're recording in a small space, I like to use a lighting setup that has a small footprint. Meaning, it's not taking up a ton of space and it's easy to put away if I needed to.
So, when you're creating a video setup consider how much space you have between yourself, your camera, and your lighting source. ALWAYS use diffusion material to soften your lights.
Many love using the Elgato Key Lights that have a frosted panel but that is NOT diffusion. When lights are too strong and harsh on your skin, you'll see harsh white blobs of light on your face, around your nose, forehead, and cheeks.
A great way to see if your lighting may be too bright is by holding up the underside of your hand in front of your face and see if you can see the details of your hand clearly or not.
Here's what this looks like.
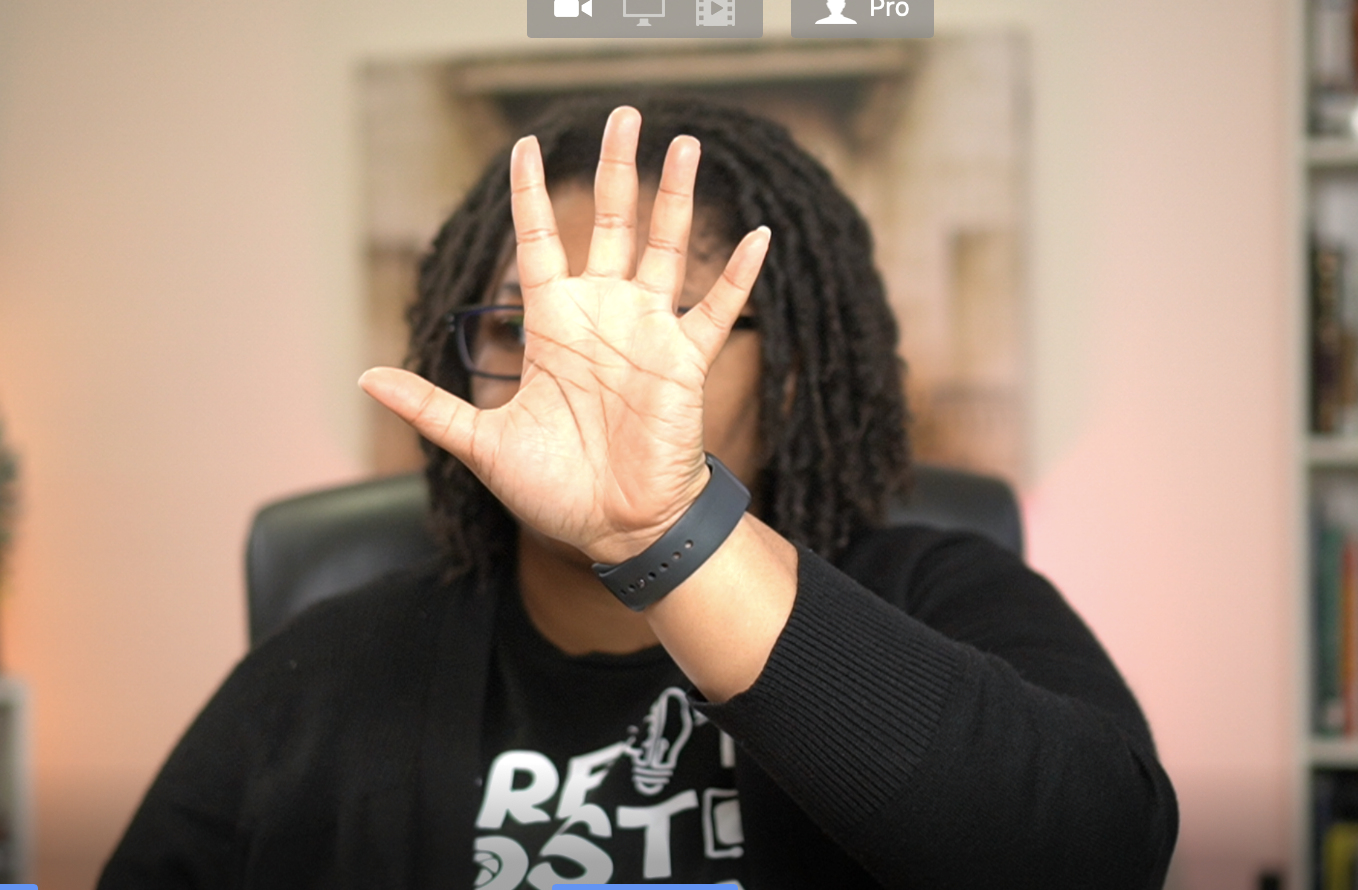
Notice how near my knuckles the image is pretty bright and harsh?
The same is true if my hand is removed and that light is shining on my face, even with diffusion material used in this example.
Now, what does that look like if it's properly exposed?

Notice how you can now see the full details in my hand and my entire hand is not visibly seen?
This is a great and simple way to see if you're overexposed or underexposed if you're not sure what to look for on your camera.
You can also test this when you hold up something white, like a coffee mug, and see if you can fully see the details of the mug or if it has an infinity white look..like an Apple commercial.
Accessories
This is another biggie.
The accessories you use can make or break your setup.
From memory cards to microphones, stands or USB hubs and cables, what you invest in here makes your setup simple or complicated.
If you're wanting a setup that works near flawlessly think through how you plan to use your setup and ask yourself,
"What's the simplest path to a great setup that makes things easy for me to create?"
For me, that meant sitting down and everything is ready to go...go figure lol.
That meant a self-sufficient system that wouldn't reset settings when being turned or off, being able to record at any time of the day or night and maintain a consistent look and audio settings that always sounded great and the same which meant using Ecamm Live so I could have a software tool that complimented the hardware efficiency.
This also meant for me gear that could grow and evolve with me over time.
So, in using Ecamm, I could connect multiple cameras when doing tutorials, assign them to Scenes, and record videos 10x faster than I was previously. Meaning I could produce multiple videos, talks and live streams and nothing shuts down or falls apart.
Final Thoughts
Your live streaming and recording setup needs to make sense.
Otherwise, you'll quit and be one of the many sellers on Facebook marketplace selling great gear that doesn't make sense when you try to match it together.
When you have gear that overlaps, isn't connected in a way that makes sense, and you're frustrated when you sit down to record...it's time to re-evaluate the efficiency of your setup.
Up Next: Why There's No Such Thing as "The Best Settings" for Your Camera
