

7 Tips to Create YouTube Videos Easier!
Jan 20, 2022What To Do Before Pressing the Record Button
We all have a routine for everything.
- Daily routine
- Morning routine
- Skincare routine
- Workout routine, and more.
We do these routines to become more organized and achieve certain goals. As a video content creator, ask yourself, do you also have a video recording routine?
I do!
Preparing yourself and your gear before you start recording is very important.
As a beginner, you may not know what things to do before pressing the record button.
After creating videos for more than five years, I have established a routine that makes content creation easier and helps me produce quality videos.
Here are the 7 things that you need to do before pressing the record button.
Tip #1 Charge Everything
It sucks when your camera battery or your microphone died in the middle of recording. It's distracting!

Photo Credits: Rode Official Channel
To prevent your camera and audio gear from dying while recording, make sure everything is fully charged.
Literally, charge everything - your phone, your computer, your microphone, your camera batteries with the spare batteries.
Make sure they are 100% recharged and will make it until the end of the recording.
Tip #2: Check Your Audio Levels

Have you ever noticed some parts of your video where the audio is too loud or too soft?
Not checking your audio levels before recording can cause your audio levels to peak if you're not careful.
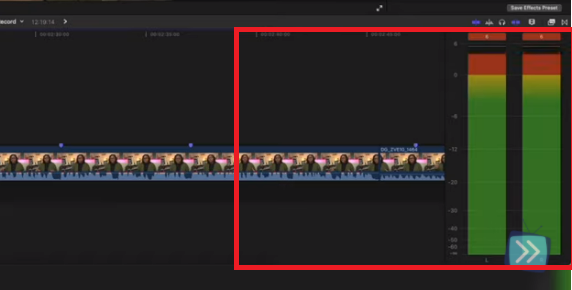
Videos, where the audio is like this, are not recoverable.
During the editing, you can increase the volume of your audio but as you increase the volume, the noise increases too.
The only option that you have is to publish that video with the distracting background noise or scrap it.
⚡️ Pro-Tip ⚡️
Test Your Audio Using Your Regular Speaking Voice
When someone is testing their audio, you'll commonly hear them repeating, "Testing 1-2-3" over and over again. This is the traditional way of checking the microphone's signal and that it is receiving sound, not to ensure the audio won't peak and become too loud when the speaker is speaking.
When it comes to your video, voicing the "testing 1-2-3" will not help you determine the correct audio level.
This statement does not provide enough vocal range in your voice for the audio levels to expand from the lowest to the highest parts of how you will actually speak or state phrases when recording your videos.
Test your audio with your actual voice.
- Read something.
- Practice your intro.
- Watch a quick video to laugh.
Whenever I'm testing my audio levels I'll state my intro with the same excitement and elevated speaking levels as I would when I'm actually recording. I'll also take a moment to watch a Tik Tok video and see if when I laugh the audio levels peak. By doing this, I'm able to find a suitable range for my speaking voice so no matter if I laugh or am speaking normally, the audio levels are always great.
You may be thinking to yourself, "I can just increase the audio levels in editing." True but that's not the best thing to rely on. When possible, get everything as close to right as possible in your camera to minimize your headaches when editing.
Once your audio is too low or too loud thinking you'll simply increase it or decrease it and you're good, you're in for a rude awakening.
Make sure that your audio levels are correct. I can't stress that enough.
Tip #3: Check Your White Balance

Not checking your white balance before pressing the record button is the number 1 reason why your videos can look weird.
Setting the Custom White Balance in your camera will help your camera provide accurate colors based on the temperature of the lighting in your environment.
A professional video editor can fix this but this is just something that you can set on your camera.
One thing that can help you set the custom white balance is a Gray card.
This is a great investment for your video kit that only costs about $7 but plays a big role in making your videos look great.
If you want to learn more about how to set your Custom White Balance on your camera with or without a Gray card, check out my step-by-step tutorial here.
Tip #4: Format Your Memory Card/SD Card
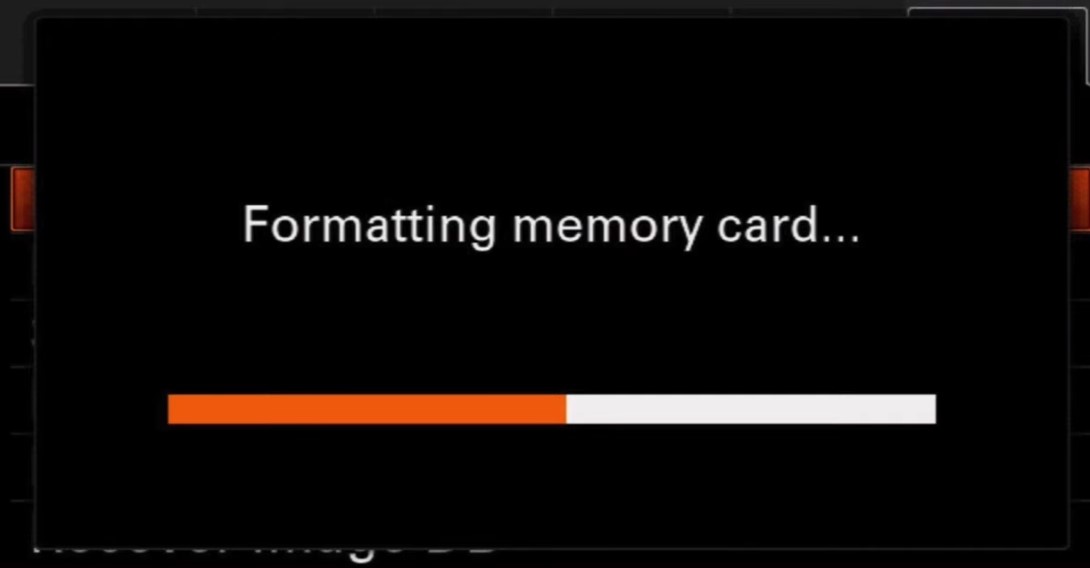
To Format means to delete.
You need to format your memory card especially when you are going to use it with another camera.
Your camera has its own structure of files and folders and when you transfer your memory card to another camera brand, your files there tend to mess up and you may lose your files.
Sometimes, your files can crash when editing so having a backup file is always a must.
When formatting your memory cards, make sure to save and back up all your files first. However, do not delete your sd card from your computer. Put it back in your camera and select the option to format your card inside your camera.
You can save them to your cloud storage like Dropbox and Google Drive if you have one or save them to an external hard drive.
Go to your camera settings and select "format" to clear off any existing files and data on the memory card before re-using it.
Tip #5: Don't Cross Your Power & Audio Cables

I can't give you a scientific explanation for this but I can tell you the effect of crossing your cables while recording is terrible for your audio and I would venture not that great for the camera either.
When your audio cable and power cable are touching each other, it creates a buzzing or whining noise on your video and it's super distracting.
To prevent them from touching take a rubber band or similar, loop that around the cable, and dangle it on the tripod hook. You can also use tape to keep the cables from touching the ground.
Tip #6: Ready Your Props & Examples

Most creators have a great video idea but they don't know how to deliver it to their audience.
Your video will be more effective to your audience if you are giving or showing them examples.
If you need to cite examples, gather your thoughts and write them down or draft them as bullet points.
Then, to show them examples, prepare your props beside you or place them near you.
Don't put pressure on yourself while recording by waiting until you're ready to record a video and then trying to decide mid-statement what example you should use.
Prepare your examples in advance.
Stressing yourself trying to come up with a good example, or trying to find your props distract your focus.
Sometimes when you can't find the thing that you want to show, you stop the recording and lose your desire to finish it.
That is one of the main reasons why you are not consistent in creating videos.
Tip #7: Have Great Audio

Have you watched a video that has a very interesting topic but the audio sounds bad?
Distracting noises' in your video can cause audio exhaustion.
People are interested in your video, they want to listen but they leave because the audio is annoying. We don't want that to happen.
The biggest thing to do to achieve great audio is to invest in a good microphone. There are a lot of great microphones available in the market that can serve you best.
If you are looking for the best cheap lapel microphones for video, I made a comparison between budget-friendly lapel microphones for you to see the difference in audio quality and help you decide which is best for you. You can check out that video and blog post here.
Always remember, before buying a microphone, analyze your environment first to know what kind of microphone you need to buy.
But did you know that if you're hearing a hissing sound in your videos, it could be coming from your camera?
How to Remove the Background Noise in Your Videos FOR FREE!
If you notice a distracting noise in your video, there is a tool that can help you clean out the audio that is very easy and free.
I made a step-by-step tutorial on how you can remove the background noise on your video. Click here and I'll walk you through it.
