

5 Sony ZV-E10 Settings You Need to Change ASAP for Video
Sep 08, 20225 Quick Function Settings in the Sony ZV-E10
Have you been creating videos with the Sony ZV-E10?
If you're transitioning from only creating live streams or videos in your office, there are some simple settings that you can customize that will make content creation so much easier.
In this post, I'm going to share with you 5 settings you need to change in your Sony ZV-E10 before creating your next video, especially if you want to start vlogging and creating videos while on the go.
Let's dive in.
1. Set your audio level to C1 Custom Dial
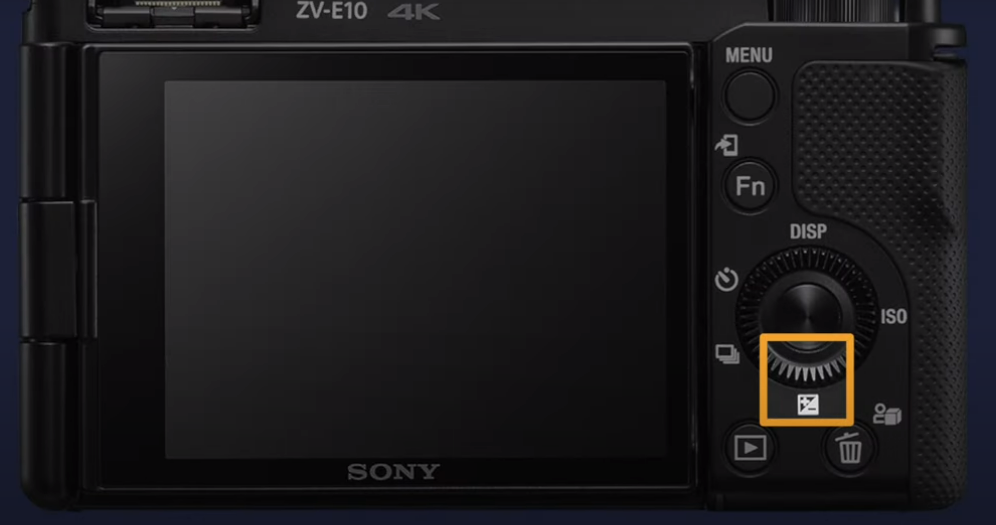
If you're recording a video while traveling, it will be easier for you to have quick access to your camera setting, especially to the audio levels menu.
Audio should be your #1 priority on your videos, and setting your audio level to C1 Custom Dial is the first thing that you need to do on your camera.

When you change the environment you're recording in, your audio levels should change as well.
Your audio level inside your recording studio is different from when you record outside your home or your office.
Your audio levels should change and adapt based on the environment you're in.
Setting the audio levels to a custom button helps you to quickly access the audio levels menu to change your audio levels as you enter noisier or quieter environments.
2. Set the Zoom Rocker to Clear Image Zoom
One of my favorite features of Sony cameras is the Clear Image Zoom.

Clear Image Zoom allows you to zoom in on an image or video using the camera's sensor.
Setting the Clear Image Zoom on your camera is the best way to achieve richer and better image quality on your videos.
Some creators are using the optical with Clear Image Zoom setting for video, but I don't recommend doing this.
This kind of setting will only deteriorate the quality of your image or your video.
To quickly access the Clear Image Zoom, I highly recommend setting it to your Zoom Rocker.
It's a quick and easy way to use the Clear Image Zoom feature without going through all your menu settings every time you need it.
Are you using the Clear Image Zoom with your Sony camera?
If you want to learn more about the Clear Image Zoom, I did a deeper explanation of how you can turn your prime lens into a zoom lens!
Watch the video here.
3. Change the Trash Can Icon for Product Showcase Mode
For some cameras, the Product Showcase Mode was already set as default.
The product Showcase Mode allows you to focus on an object that was placed in front of your camera.
It gives a nice transition between your face to the object that you want to focus on.
However, the look of your video will always depend on how deep the depth field you have.
If you use a lens like the Sigma 16 and set the aperture to f1.4, the image will look blurry.
But if you change and set the aperture to f4, everything will look great and in focus.

How to access the Product Showcase Mode quickly?
The Trash Can Button on your camera is the shortcut to the Product Showcase Mode.
Pressing the Trash Can Button allows you to switch on and off the Product Showcase Mode.
Whatever aperture was set on your camera, always make sure to set your Product Showcase Mode ON to avoid going through the menu setting of your camera when you need it.
4. Auto Exposure Lock on Downward Directional Button
Most new creators don't know about this!
Do you know that you can lock your camera settings?
One setting that I like to leave in auto mode is the ISO.
Whenever I change the environment from indoors to outdoors, I don't need to stop and make changes to my ISO settings.
I let it choose the best setting for my video based on my environment.
But when my camera finds a good exposure mode, I stop and press the downward directional button to lock the exposure setting.
The downward directional button is the shortcut to the Auto Exposure Lock also known as AEL.
The AEL allows you to lock the exposure setting of your camera to avoid fluctuating exposure while recording a scene.
This feature is very helpful, especially when you're recording outside to different scenarios.
5. Default to My Menu Screen
Some content creators get frustrated going through a lot of menus on their Sony camera just to get to the My Menu Tab.
They can't help but compare it with other cameras like Canon.

Sony camera menus were set exactly the same as the Canon cameras.
It has the following menus:
- Photo tab menu
- Video tab menu
- Network tab menu
- Play and Replay tab menu
- Toolkit tab menu
- My Menu tab
Among these menus, the My Menu is used more often.
In this tab, you have the access to the Shoot Mode, File Format, Record Setting, USB Streaming, and other essential settings for videos.
Setting the My Menu as the default screen will give you quick access to your MY Menu tab.
You don't need to stress yourself going through different tabs and menus on your camera just to get on your My Menu tab.
So before creating your next video, go to your My Menu Tab's last page and set the Display From My Menu to ON.
Final Thoughts
Setting quick access to the most used setting on your camera will make content creation easier.
It will help you achieve a good-looking video without stressing about changing your camera setting quickly to adapt to a new environment.
Are you confused about these camera settings on the Sony ZV-E10?
That's fine. Learning how to use your camera takes time.
If you need an in-depth tutorial on how to optimize your camera for video recording and livestreaming, I did a video for you.
I break down every menu, cover what settings I used for regular content creation and how to customize the buttons and menus in the Quick Function settings with the Sony ZV-E10.
Watch the video here.
